Congo Bars
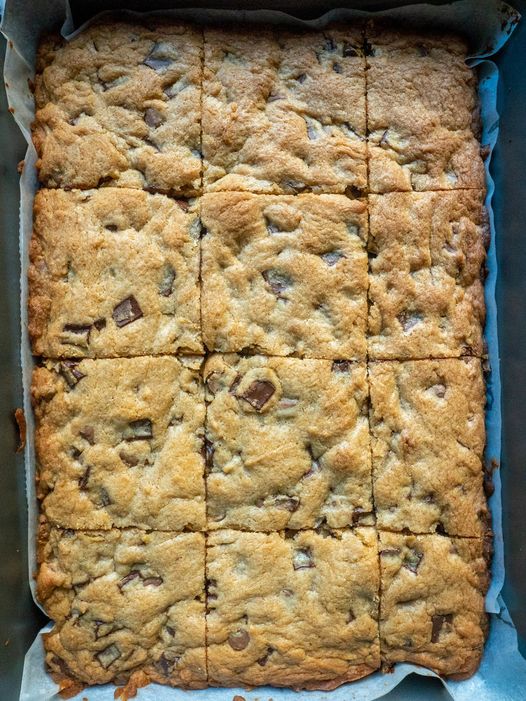
Do I know why these are called Congo Bars? I do not. But what I do know is that they’re an utterly irresistible thick and chewy bar loaded with two kinds of chocolate and plenty of brown sugar and butter flavor. Imagine if a blondie and a chocolate chip cookie had a baby and then you upped the chocolate a bit for good measure – you’d have these. They’re soft, they’re just gooey enough, and they’re an absolute classic.
These bars have staying power but they’re actually a vintage recipe. Congo Bars were common in church cookbooks and grandmas’ kitchens for decades and they taste every bit as good today. That’s generally a good sign that they’re perfect for things like bake sales and potlucks and parties, but I certainly don’t mind just having a tray sitting out on my own kitchen counter as an afternoon pick-me-up. (No one else in my family has complained about that either.)
Other pros? They’re easy to make. It’s a one-bowl batter where you simply cream together some butter and brown sugar before adding in eggs, vanilla, flour, etc, and then both milk chocolate chips and semi-sweet chocolate chunks. The two kinds of chocolate melt a bit differently and help ensure that you get a good hit of chocolate in every single bite but that it’s not just sweet, sweet, sweet.
Why You’ll Love This Recipe
If you’re a fan of chewy, chocolatey delights, then this recipe is a must-try. Not only are Congo Bars incredibly delicious, but they’re also a breeze to make. Their vintage charm and universal appeal make them perfect for sharing at gatherings or savoring alone as a treat.
Kitchen Equipment You’ll Need
- 9×13-inch baking dish
- Parchment paper
- Electric mixer
- Large mixing bowl
- Rubber spatula
Ingredients
- 1 cup (2 sticks) butter, at room temperature
- 2 cups brown sugar, packed
- 3 large eggs, at room temperature
- 1 tablespoon vanilla extract
- 1 teaspoon Kosher salt
- 2 teaspoons baking powder
- 2 1/2 cups all-purpose flour
- 1 1/2 cups semi-sweet chocolate chunks
- 1 cup milk chocolate chips
Preparation
- Preheat oven to 350°F. Line a 9×13-inch baking dish with parchment paper and grease with nonstick spray. Set aside.
- In a large mixing bowl, beat together the butter and brown sugar with an electric mixer on medium speed for 2 minutes.
- Add eggs, vanilla, salt, and baking powder and mix to combine, scraping down the sides of the bowl.
- Reduce mixer to low, then add flour. Mix until just combined.
- Stir in chocolate chunks and chocolate chips.
- Transfer dough to prepared pan and spread out with a rubber spatula. Bake until edges are set, about 30 minutes. Center will seem slightly underbaked and gooey.
- Let cool in pan 5 minutes before removing and allowing to cool completely. Once cool, slice and serve. Enjoy!
Tips for Success
Ensure your butter is at room temperature for easy creaming. Be cautious not to overmix the dough once the flour is added to maintain the perfect chewy texture. Allow the bars to cool completely before slicing for clean, neat squares.
Additional Tips or Variations
Feel free to experiment with different types of chocolate, like dark chocolate or white chocolate chips, to suit your tastes. You can also add nuts for an extra crunch.
Nutritional Highlights (Per Serving)
Each serving of Congo Bars is a delightful mix of carbohydrates, sugars, and fats, making them a rich treat. Exact nutritional values may vary based on the size of your pieces and specific brands of ingredients used.
Frequently Asked Questions (FAQ)
Can I freeze Congo Bars? Yes, they freeze well! Wrap them tightly in plastic wrap and place them in an airtight container before freezing.
How long do Congo Bars stay fresh? They can stay fresh for up to a week if stored in an airtight container at room temperature.
Can I use salted butter? If using salted butter, you may want to reduce the amount of added salt in the recipe.
Conclusion
I hope you’re as excited to try these classic Congo Bars as I am to share them with you. Whether you’re making them for a crowd or keeping them all to yourself, they’re sure to satisfy any sweet tooth. Don’t forget to let me know how they turn out and share your own twists on the recipe in the comments below!

