Apple Fritter Pull-Apart Bread

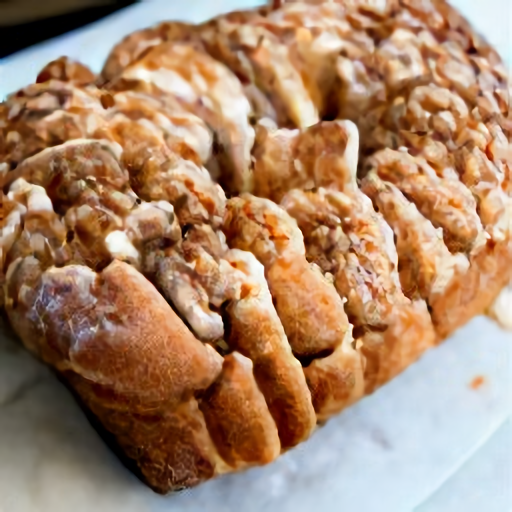
An apple fritter is like a celebration of fall in one little package. A sweet, doughy delight filled with tender spiced apples and perfectly fried… and don’t forget the sugary glaze that tops it. Well, we’ve got an option for you that hits all those same notes but is a lot more shareable and way easier to make at home – Apple Fritter Pull-Apart Bread! There’s no frying to worry about and since it uses the shortcut of refrigerated cinnamon roll dough, it’s a bread with no yeasted dough to tend to.
Why You’ll Love This Recipe
This Apple Fritter Pull-Apart Bread is the perfect combination of sweet and spicy, with a touch of tartness from the Granny Smith apples. It’s a simple and quick way to enjoy the flavors of a classic apple fritter without the hassle of frying. Plus, it’s a great shareable treat for gatherings or a cozy family dessert.
Kitchen Equipment You’ll Need
- Loaf pan
- Parchment paper
- Small mixing bowls
- Whisk
- Grater
- Wire rack
Ingredients
- 2 (8 count) packages of cinnamon rolls
- 1/2 cup (1 stick) unsalted butter, softened
- 1/2 teaspoon vanilla extract
- 2 large Granny Smith apples, peeled and grated
- 2 teaspoons cinnamon
- 1/3 cup granulated sugar
- For the glaze:
- 1/2 cup powdered sugar
- 1-3 tablespoons cream
Step-by-Step Instructions
- Preheat oven to 350°F and grease a loaf pan with butter or nonstick spray. Set aside.
- Remove cinnamon rolls and icing from the package. Discard icing or set aside for another use.
- Take each cinnamon roll and stretch it out until it becomes flat like a pancake and lay them out on a parchment paper-lined work surface.
- In a small bowl, whisk together the butter and vanilla until thoroughly combined. Spread the butter mixture evenly over each flattened cinnamon roll and then top with grated apples.
- In a separate small bowl, mix together the sugar and cinnamon and sprinkle evenly over the apples.
- Layer cinnamon rolls in stacks of 3 or 4. Once all rolls are stacked, transfer each stack to the loaf pan, standing them on end so no apple filling touches the ends of the pan.
- Cover tightly with foil and bake for 30 minutes. Remove foil and bake for 15-20 minutes more.
- Remove to a wire rack and let cool 10 minutes before removing from the pan.
- While the loaf cools, make the glaze by mixing powdered sugar with 1 to 3 tablespoons of milk or cream until desired consistency is reached. If you’d like a more pourable consistency, microwave for 10 seconds.
- Drizzle glaze over cooled loaf and enjoy!
Tips for Success
- Ensure the butter is softened so it spreads easily over the dough.
- Grate the apples finely to ensure even distribution and to avoid chunks.
- Covering the loaf with foil while baking helps to keep the moisture in and ensures the bread doesn’t dry out.
Additional Tips and Variations
- Try adding a handful of chopped nuts for a bit of crunch.
- Use different types of apples for a varied flavor profile.
- You can add a splash of lemon juice to the grated apples to enhance their tartness.
Nutritional Highlights (Per Serving)
While specific nutritional details will vary based on portion size and any ingredient changes, this treat is a delightful indulgence perfect for an occasional sweet craving.
Frequently Asked Questions (FAQ)
Can I use fresh dough instead of refrigerated cinnamon rolls?
Yes, but using fresh dough will require additional preparation and proofing time.
How should I store leftovers?
Store any leftovers in an airtight container at room temperature for up to 3 days.
Can I freeze this bread?
Yes, you can freeze it without the glaze. Wrap it tightly in plastic wrap and store it in the freezer for up to a month. Thaw and glaze before serving.
Conclusion
This Apple Fritter Pull-Apart Bread is sure to become a favorite in your household. It’s a deliciously simple treat that captures the comforting flavors of fall. Give it a try, and don’t forget to share your experience with us. We’d love to hear how it turned out!


