
I proceeded to ask him LOTS of questions 🙂 He recommended top coating with a matte polyurethane – what they make that? YES! I’m in…
What is especially unique about the Valspar Chalky Finish Paint is it can be tinted into ANY color from their rack or one you want to match.
Annie Sloan doesn’t have that option and one of the primary reasons I chose the Valspar brand.
Post contains hand selected products, with some affiliate marketing links {full disclosure here}
How I Transformed My Stained Credenza with Chalk Paint
I’m not going to lie I was VERY nervous the night I decided to cover over my beautiful credenza.
I may have even teared up, but I KNEW the look I wanted and chalk paint was the answer.
PAINT SUPPLIES
- Painter’s Plastic
- Frog Tape
- Valspar Chalky Finish Paint
- Annie Sloan Brush
- Craft Brush
- Flexible 220 Grit Sandpaper
- Matte Polyurethane
As a preparation step, I attached a couple of swatches of the color I was considering and watched it throughout the day.
NEW POST: THE BEST WAY TO TEST A PAINT COLOR BEFORE PAINTING FURNITURE
It’s a simple trick that helps a ton! The accent color of the credenza was just about the same color, so I knew I chosen the right option.
Remember: matte paint will look lighter than the sample.
VALSPAR, SHARKFIN 4007-2A

STEP 1 – PREP THE AREA BEFORE APPLYING CHALK PAINT
Prep the area: floor and walls. Tape painter’s plastic up the adjacent wall, tape around the feet at the floor, and I also taped off the marble top.
Obviously, this is a large piece that I wasn’t going to move to paint :).
Shown later: lay drop cloths or cardboard to protect the floor.


STEP 2 – CLEAN THE FURNITURE SURFACE
Clean and dust thoroughly! You want the cleanest surface possible, so the paint adheres.
Frankly, I don’t use a special cleaner just some Windex and a microfiber cloth.
STEP 3 – TEST FOR CHALK PAINT BLEED THROUGH
Test an inconspicuous area FIRST. You want to make sure the stain doesn’t bleed through!
Wait 8 hours for the test to dry. If you have bleed through?
You must prime first with Bonding or Stain Blocking Primer.
Click here, for what to do if you experience chalk paint bleed through and get those strange red or brown stains appearing through the paint.
Luckily I didn’t have issues with this piece.

STEP 4 – CHALK PAINT OVER THE STAIN AND POLYURETHANE
No bleed through, then get painting!
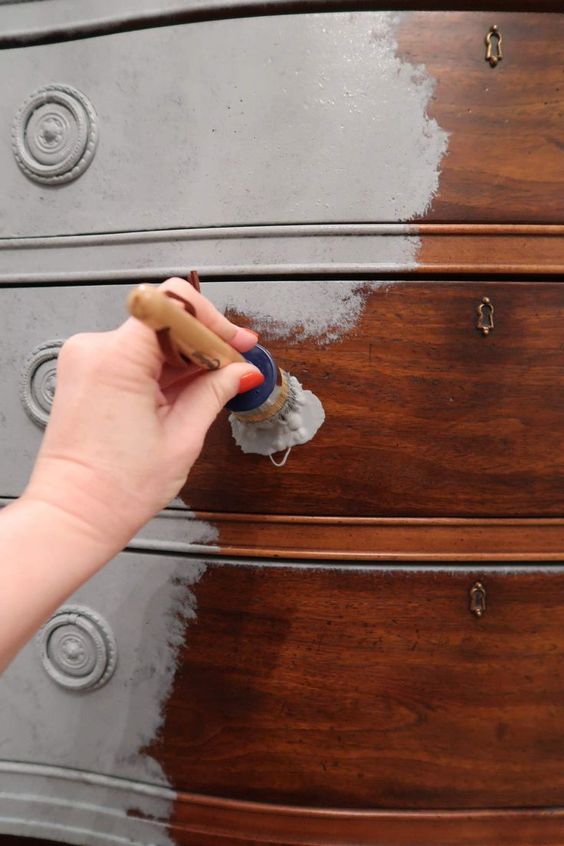
The Annie Sloan brush is not like a typical paint brush, so please follow her instructions on the package and “prime” it before using.
Also, hanging it to dry after cleaning is really important.
I literally “pounced” on the paint which pushed it into the details in the wood and carved areas.
The motion is more like tapping than brushing.
It was easy and FAST. The first coat took maybe an hour!

Originally, I didn’t plan to paint the hardware.
Unfortunately, his hardware wasn’t removable so I painted over it but sanded the paint off – below.
You can see NO brush marks and I wasn’t being careful 🙂

STEP 5 – LET CHALK PAINT DRY AND RE-COAT
Let dry at least overnight and apply 2nd coat!
One Coat

Two Coats

STEP 6 – SAND CHALK PAINT OFF OF HARDWARE
Sand off chalk paint from hardware using the 220 Grit Flexible Sand Paper.
I LOVE this stuff because you can wrap it around your finger to get into small areas.

You can see the beautiful gold come through, with an antique effect where the paint remained in the crevices.

I was pleasantly surprised by the new gold, which was previously more of an antiqued gold.
This gold looks more like a gold leaf and softer!
STEP 6 – TOUCH UP AREAS OF CHALK PAINT
It was IMPOSSIBLE to not remove the paint from around the hardware, so you will have to touch up.
Make sure to wipe off any sanding dust first.
Using a little craft brush, I touched up around each piece of hardware and looked for any other small areas to touch up.
Don’t worry it will dry the same color and blend right into the original paint!

STEP 7 – POLYURETHANE OR WAX OVER CHALK PAINT (OR SKIP TO OPTIONAL COLOR WASHING)
You may want to use a wax and if so, please follow the manufacturer’s instructions.
I chose to use a Polyurethane, so this piece can be easily painted over later in life.
Dry for 7 DAYS, before applying Matte Polyurethane.
You want the chalk paint to be CURED, before applying the protective coat.
This will ensure the chalk paint is completely adhered to the surface.
- Apply with a high quality brush in a very thin coat. Allow to dry overnight.
- Lightly sand with the 220 grit sandpaper over areas that feel rough to the touch
- Apply 2nd coat of polyurethane. Allow to dry overnight.
- Sand any areas that feel rough and you’re done!
Sorry, I didn’t photograph this stage!
OPTIONAL STEP: Color Wash Over Chalk Paint
Because this piece has so much detail and I wanted to add a little dimension I decided to add a color wash.
I chose to wash it in a blend of light cream and light gray, to lighten the overall look.
Dark gray or brown could have also been used, for a totally different antique effect.
HOW-TO MAKE A PAINT COLOR WASH
Old paint samples were laying around my house and I mixed them together to get the color I wanted.
Then I added 50% water to make the color wash. Simple!
The wash should be thin and run fast off of your spoon (this is plastic spoon and I’d recommend one!).
The little dark spots you see in the photographs are where the credenza is distressed.
Tip: Don’t get a manicure before applying a color wash because it will ruin it!

STEP 1 – APPLY COLOR WASH OVER CHALK PAINT
Starting in an inconspicuous area (like the back of the door), so you can adjust your technique, apply color wash with the Annie Sloan brush.
You can see I was aggressive in my application!

You must work FAST because the wash is so runny and you don’t want it to dry.
STEP 2 – WORK IN COLOR WASH
Cut up an old T-Shirt to wipe the color wash.
Important: Don’t use paper towels or anything that may be too rough or leave lint!
Wipe down gently to remove excess color and push the wash into the crevices and carved areas.
I added extra wash to the carved segments, in a second application.
The wash will come off WITHOUT A LOT OF PRESSURE – you don’t want to remove the chalk paint underneath.
I used the same T-Shirt for the whole project and just kept using new areas.

I ended up moving left to right and finished late in the day – sorry for the dark final image.
That’s it! Complete with color wash!

You can see it is a very subtle color change that adds highlights.
The lighter wash gives it a very dusty feel of an old world piece.
It tricks the eye into seeing the recessed areas, but without making the original paint color darker.
GO BACK to the Polyurethane Step for FULL Protection
Curious about my paint colors? 
Download them by clicking this picture and signing up for my weekly email!
The Final Credenza Transformed
What a difference a little paint can make. The credenza has a whole new look and feels lighter.
It was the perfect complement to the dining room makeover and is a true show stopper.
The chalk painted credenza is the first thing people gravitate toward when they enter my home!

SHOP THE LOOK
<
>
I hope you feel inspired to tackle a piece of furniture and transform it with chalk paint!
My Favorite Furniture Paint
Are you surprised to hear that chalk paint is not my favorite furniture paint?
Before you paint your furniture, please read this post about a furniture paint that requires NO TOPCOAT.
In fact, almost ALL of my paint projects have been completed with my favorite furniture paint.
If you’d like to see more of my home and learn about the different paint colors I’ve used, please head to this HOME TOUR.
Or if you want to see some amazing room transformations, read my Before & After Home Tour to see what is possible.
Good luck on your next painting adventure!
Please consider signing up for my weekly email newsletter and following me on Pinterest and Instagram for daily inspiration.
Until next time…