For those who are gravely concerned about the height of the pavers, I’m happy to report that it is incident free; no one has tripped or sprained any ankles this year 🙂
The weeds have been virtually non-existent. The preemptive weedkiller, landscape fabric, sand/mulch, and rock combo has staved them off for one year at least and held up well. There have been a few tiny ones that started to sprout up around the border (in the area with white rocks where we didn’t lay the landscape fabric) and thanks to some helpful tips from commenters here, they were easily taken care of with some vinegar and hot water.
Lots of people have also asked about Snickers the mini-aussie and I’m also happy to report, she still loves the space! She enjoys lounging on the concrete patio and looking at the plants. Not to worry, she still has plenty of space to “do her business” just on the other side of the fence where there is a large grassy area to play!
We may end up reorganizing the pavers and adding a few more rows this summer, now that we have some extra funds, but all in all it has worked out well so far. Considering our low budget last summer, this was the perfect makeover for us at the time and for anyone thinking of doing this project in your own small backyard, its very durable and can be done in one weekend!
Now back to the original post….yuck, look at that before!
Patio area “before”!
One of the main attractions to buying our condo was that it actually has a fenced in patio and small yard. There is a sizable concrete slab sitting area, which is in dire need of stripping and re-painting (which is another project for another week) and this small 8’x12′ area shown above. Our yard area was just a big mix of mulch, rocks, and weeds. Although I have zero landscaping experience, and am not known for my green thumb, we wanted to start from scratch and create a more useable space with concrete pavers and rocks (minus the weeds!).
We started off by pulling out as many weeds as we could, then taking a shovel and transferring as many of the existing rocks over into the border area. I liked the contrast of the white stones against the fence (it looked a lot brighter already) and I know I’m going to use the area only as a container garden.
Using a hand tiller, we began breaking up the soil, trying to pull of the weeds out by the root, and getting rid of the excess dirt. Turns out our soil is pretty full of clay and it was quite difficult to break up.
We dug down about 3″ below our existing concrete patio slab and used a hand tamper to pack the soil down and do our best to level out everything.
In an effort to stay on top of any weeds that may return, I sprayed some preemptive weed killer and layed out a roll of landscape fabric once the ground was nice and level.
We used 3 bags of paver leveling sand on top of the landscaping fabric to even out any remaining low spots and give the pavers something extra to “grip” on to.
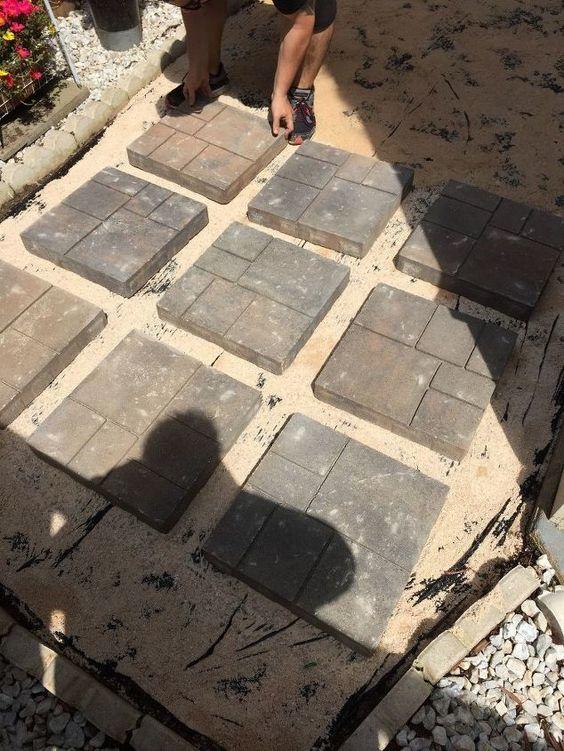
Using 16″ x 16″ concrete pavers we bought at Home Depot (for only $4.77 each!) we placed them out in a grid pattern, with 6 rows of 3 pavers. This covered our 6′ x 12′ space with around 6″ between each paver. I originally wanted them closer together, but didn’t want to spend too much more on pavers. They are spaced just right so that a few extra chairs could go out there if needed.
Once the pavers were placed where I wanted them (which involved a lot of me moving things 1″ to the left, then back 1/2″ to the right, etc), we filled put down a layer of mulch between them all. After that, we poured bags of landscaping rock on top of the mulch, to fill in the gaps between the pavers. I sprayed it all down with a little bit of water to help get rid of all of the dust and let the stones start to settle. Once it rains a few times and everything settles a little more, we may have to add a few more bags of stones around the pavers to help keep them in place, although each of these pavers weighs 47 lbs (which we calculated to be just over 800 lbs that we had to transport) so they’re not going to move far. Since we took the extra steps at the beginning to make sure the ground was level, *so far* they aren’t wobbly and make for a nice solid area to walk on.
Snickers wanted to help, so she watched over everything while it dried off!
Voila! Our “weed garden” is now a useable space and has really given a whole new look to our patio and backyard!
Check out this before and after photo, what a difference!
You can find the materials list and more thorough details on my blog at www.alchemy-home.net