

I had cleaned the table thoroughly with soap and water when I got it home, so my mom decided to get off any residual dust or dirt with a quick wipe-down of deglosser on a rag.

Then, we went over and brushed on a coat of the deglosser onto the entire table. Be careful when handling this stuff – it’s not good to get on skin! Wash it off with soap and water if you drip any onto your arms or legs during this step.

Let sit according to directions on bottle. This step preps the table for us so we don’t have to sand. YAY!

Stir the PolyShades very gently with a stir stick to avoid adding any bubbles in and then brush the stain on with the grain of the wood, working in sections. This sets very quickly, so work to get the product down and then go over with a final stroke to make everything look pretty before moving on to the next section
Note that the grain on this table was a chevron-type pattern, so we elected to go across the grain. It still looks good, but you can still see strokes in both directions. That was the nature of the beast with this table, though!

Don’t forget to do these same steps with the leaves as well.

After the first coat is dry (we waited overnight – it was very humid and hot), go over the surface with 000 (said “triple ot”) steel wool in smallish circles. You don’t need to scour the surface, but you should be able to see where you’ve went over with the wool.

Pick up dust and any debris with a good wipe-down with a tack cloth. (Tip: be sure to store these sealed up in plastic, as they can dry out if left out in the open for a too long.)
Now apply the second coat of stain and let it dry!

The next day, mask of your beautifully refinished top with some plastic and secure the edges with painters’ tape. If you’re a pro at painting like my mom, you could skip this step and just use a cardboard shield while spraying your primer.
Oh, here’s a good place to make sure your table legs are clean by going over them with soap and water. Let dry completely.

Apply spray primer to your table legs. I followed the can’s instructions and found that two coats of primer was perfect. I used about a can and a half of primer, so plan accordingly! (I was also learning how to spray paint, so my numbers may be a little skewed.)

After your primer is completely dry (give it a few hours), apply your first coat of paint. Use a small paint brush to get into detail work and grooves. The first coat take about three times longer to paint than the second coat, promise! After the first coat’s dry, apply the second coat.
Let the table dry for as long as possible before sealing it. Once you seal it, nothing underneath is going to be able to breathe to dry any more. I waited overnight just to be safe.

Follow the poly’s instructions to apply the sealer the table. I applied four thin coats of the Polycrylic to get a really good amount of protection. The satin finish of this product is delicious!

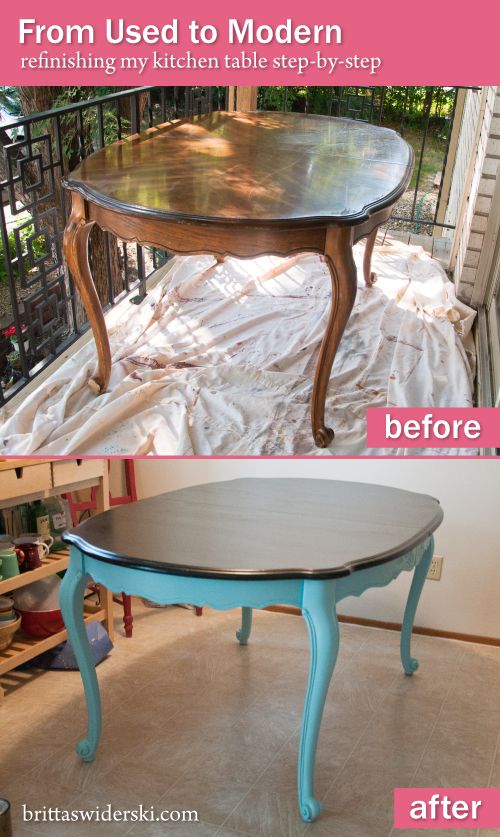
And here’s the finished top. It’s dark, but you can still see some of the woodgrain show through. I love it.

Here’s a better look of the satin finish on the legs. It’s just so perfectly satin…. and it looks awesome, too.
So what do you think? Was my first refinishing job a success?
It took about 14 hours of total work to complete and was worth every minute. The entire thing was a learning process, so I have a feeling the process won’t be *quite* as long next time. That being said, patience and proper timing is the name of the game in refinishing furniture. I found something so cathartic about this whole process, and being able to learn my mom made this experience all the more special. Since finishing the table, I’ve started work on the dining chairs and already have plans for a few more pieces (at least three – ah!) to refinish from the living room.
I’ve added a new category to the side of my blog titled “DIY Home” and plan to add to it regularly from this point onward. I’ve spent *a lot* of time at Home Depot lately. Teehee! Stay tuned for more of this and more of that. More cards, more crafts and more life.
Thanks for stopping by today and for letting me share my adventure with you!
Love,
Britta