

Pretty Sliding Barn Door. It Slides Behind a Dresser.
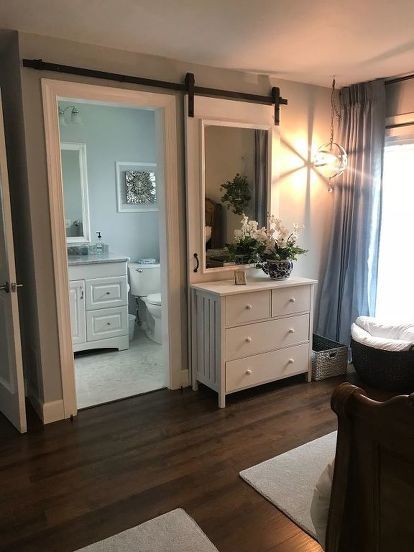
Picture with the barn door opened. Slides right behind the dresser

This is the entrance to bathroom before. Sink is offset to the left and since I like to use the mirror from the medicine cabinet for applying my makeup that darn door was always in my way.

This is a 34 x 84” hollow core door. Went with the hollow core door again because it is lighter in weight. 34 x 84“ is a special order and costs a little more. I wanted to keep the trim and I wanted the door height to clear the trim.
You can see in this picture I decided to install the barn door hardware first. Wanted to get a visual as to where to place the 24 x 42” mirror. Please note that because I wanted to keep the door casing, I had to add a couple of extra washers to the screws that attach hardware to wall into studs. After deciding on placement of mirror, I glued and screwed a 1/4” x 1.75” x 27.5 “ piece of wood to the door for mirror to rest on. Glueing the wood adds more strength to the door to hold the mirror than just screws. Be sure to wait a few hours for the glue to dry.

Another view checking for placement of mirror

I rested the mirror on the wooden strip. I temporarily screwed washers in the top of mirror to hold in place. I then glued and nailed the same strip of wood around the mirror.

I glued and nailed molding around the mirror and added a wood trim frame on lower part of door. Glued moulding for added strength to hold mirror in place

In this picture you can see I have removed the door stop trim. I Covered the inside of the door jamb with toe kick which hides where the hinges and hole where the door knob piece goes into the door jamb. Caulked all around and it’s barely noticeable
Please note because I have opted to keep the trim i Haven’t found a barn door latch that will work. I could use a hook and eye closure but I prefer not to. For me, if the door is closed it’s in use. Because there is a clearance issue you cannot use a regular handle on the bathroom side of the door. I opted for a back plate of a cabinet knob. Didn’t use the knob. Just the back plate. Just enough of an edge to open and close the door. I realize this may not work for everyone.

Just tacked a tacked a flea market poster

Mitered baseboard molding to create a frame and nailed it right into wall. Couldnt use a regular frame because the door wouldn’t clear.

Mitered corners of frame. Please see my other post for tutorial on making a picture frame from molding.

Another view

Picture of my cathedral barn door in case you haven’t seen it.

Picture of my sliding barn door bedroom closet doors closed

Closet doors open.
I’m finally finished with my doors.
Hmmm. On to the next project.