

These pictures are for real, I am not making this up. You’ll see how pink the rest of the bathroom was next week on my big Guest Bathroom Reveal post!!!
I knew that replacing the tub and tile was WAY out of our budget so I started looking around at other options. That’s when I found a product called Tub and Tile Transformation by Rust-Oleum.

I did some research and figured it was worth giving a try; I mean really, what did I have to lose?
TUTORIAL:
1. Prep the area:
- Prep the area by cleaning it first. Use something that will be sure to take off any built up grease or grime.
- Remove all the existing caulking with an X-acto knife. If you don’t use a good knife this process could take much longer than it needs to.
- Remove fixtures and hardware
- Sand the entire surface to remove any gloss/shine. The sanding isn’t meant to take off layers of your tile, it’s just meant to scuff up the tile/tub to remove any remaining oils/grease, and to give the product something to adhere to.
The prep took me about 45 minutes but most of the was trying to get the 25+ year caulking off.
2. Next you mix together the two cans of the Refinishing Kit. My only warning is that it smells terrible! Make sure you are wearing a mask and have the fan on in the room. I opened the window in our bathroom too, even though it was pouring rain.

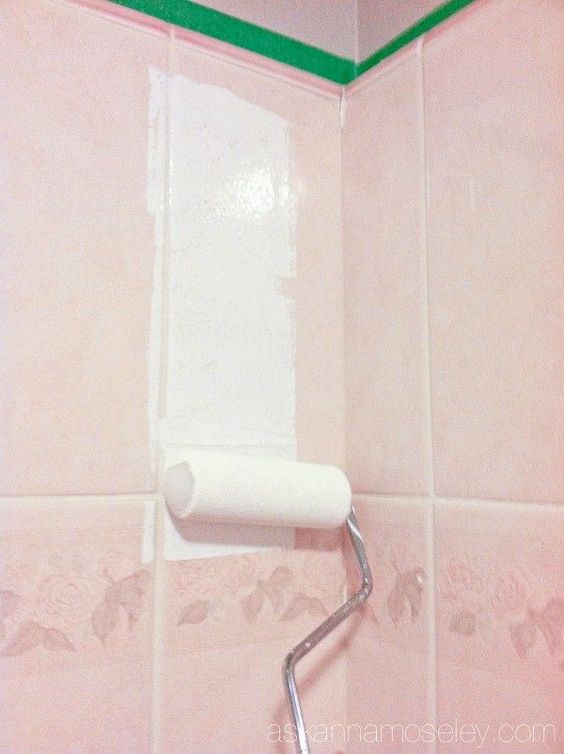
When I put my first stripe of paint on the tile I got really excited. See you NEVER again pink tub and tile!


I painted all the walls first so I could stand in the tub, here’s what it looked like after my first coat on the walls.

Isn’t it crazy how much brighter it looked after just having painted the walls!? Here’s what it looked like after the first coat on almost the entire thing.

Bye-bye last little bit of pink! (Can you tell I couldn’t wait to get rid of the pink!?)

3. After the 1st coat I let it sit for an hour and then came back to paint the second coat. Then I let it sit over night to dry. The next day I peeled of all the FrogTape and I swear I heard angels singing!

Isn’t it AMAZING!?! I seriously couldn’t believe how much better it looked! Let me just remind you of how far we came in just 1 day, and only a couple hours of work.

After re-caulking the tub (click HERE to see how to do it like a pro) we added a new shower head and tub filler and I couldn’t be more thrilled with how it looks now!

Isn’t it amazing how much brighter the room is now!? THANK YOU Rust-Oleum Tub and Tile Transformation!!!
Here’s a little video which shows the before and after, talks about the durability and how it’s holding up after a month of use and cleaning!
***To see my video review of how the product is holding up a year later, click HERE.***