How To Refinish a Table, Chairs, & Fabric Seat Covers
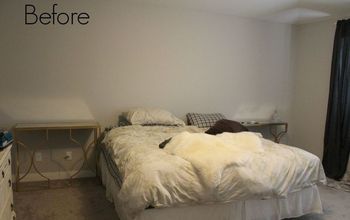
Before:
Process:
Faux Wood Tabletop & Chairs
Trending videos
First, I did what I should have done two re-re do’s ago… sanding! I have skipped this part in the past because I was a less knowledgeable DIY-er & also because it kinda stinks. But it’s extremely important for creating lasting coverage on your pieces. Started by using 120 grit to take off the multiple paint layers of past redo’s.
After you get to the base of the piece finish it off with a smooth grit sanding pad, 220 grit is my goto.
TIP: Buy an electric sander unless you want muscles like Popeye the Sailor
Use a dry cloth to remove all debris & clean the surface.
Depending on what look you are trying to achieve, you can either go ahead & jump right in or you can apply a primer layer like I am doing.
Next, I painted the base of the table with Eclectic’s White Ning paint.
After the primer is dry it’s time to start on the fun part! I really wanted a faux weather wood look for the top so I started by dry brushing Eclectic’s Rustic Reality on first.
Dry brushing just means I wipe the majority of the paint off with a paper towel
Once you are happy with the first color layer move onto the next lightest color. My next color was Squirrel.
This portion of DIY is less science & more art. You can go back & forth between colors & use different variations of brush “wetness.” You can also dilute the paint with 0-10% water for different opaqueness.
For the last layer I used Squirrel, Weathered Daydream, & Midnight’s Blackness mixed together.
I used a clean dry rag to apply it to the entire surface.
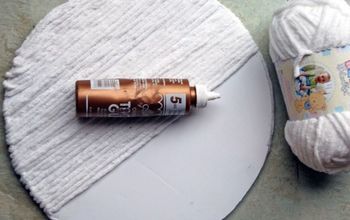
Sealing The Tabletop:
Famowood Glaze Coat
Once the paint is dry, seal it with Famowood Glaze Coat from Eclectic. Mix equal parts of A & B together before pouring.
Next, I poured the mixture over the tabletop & smoothed with a metal scraper. Be sure to have the floor protected because the excess will run over the sides.
I used a foam brush to coat the edges of the table also.
Chairs
Step one of the chair extravaganza is removing the fabric from the cushions. Lucky for me I didn’t do a great job of attaching them the first time. So I simply removed the staples with a flat head screwdriver & pliers.
After the fabric was removed it was time to pick something fresh & new for the chairs. Honestly I cheated & bought plain fabric chair covers off of Amazon. If you want to make your own with regular fabric though feel free!
If you want the fabric to be permanently bonded to the seat use E-600 Spray Adhesive. My seat covers are washable though & I like the idea of being able to get rid of any “sticky” toddler situations with simple removal. I might change my mind later though i’ll keep you posted!
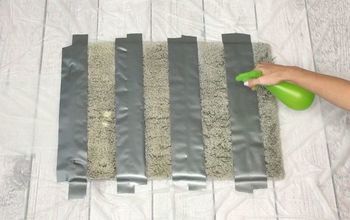
After I had the cover securely over the cushions it was time to add my own personal touch to them. I outlined lines using painters tape & a straightedge to make sure all the lines would be uniform.
Next, I mixed 1 part of White Ning with 5 parts E-600 & used a brush to apply it throughout the lines.
It may take a couple of coats after you let it dry.
I also added two lines of Weathered Daydream to each side. The paint needs to dry for about 5 hours but is washable after that!
Chair Base/Attaching The Cushions
For the chair base I used undiluted White Ning. I reattached the cushions to the base using the bolts that originally attached them together. You could also use a strong adhesive staple the fabric ends to the chair base itself.
Y’all this turned out even better than I imagined!
I love how rich the colors of the Unicorn Spit are & that I was able to mix different color combinations for the perfect faux wood look!
The painted fabric feels a lot softer than I was expecting & added a little something extra to the seat covers.
Let me know what you think of my color choices for my re re re redone table & chairs!


Frequently asked questions
How did you keep your little toddler helper from helping you with the project? It would draw most toddlers like a magnet! Gotta help Mommy!
View answers
How did you know to mix e-6000 glue with paint? I have never heard of that before. Great job love the way it all came together and looks amazing
How long did you let the top glaze coat dry before you could really use the table? Thanks for the great ideas!
View answers