

Easy Sew & Rope Basket
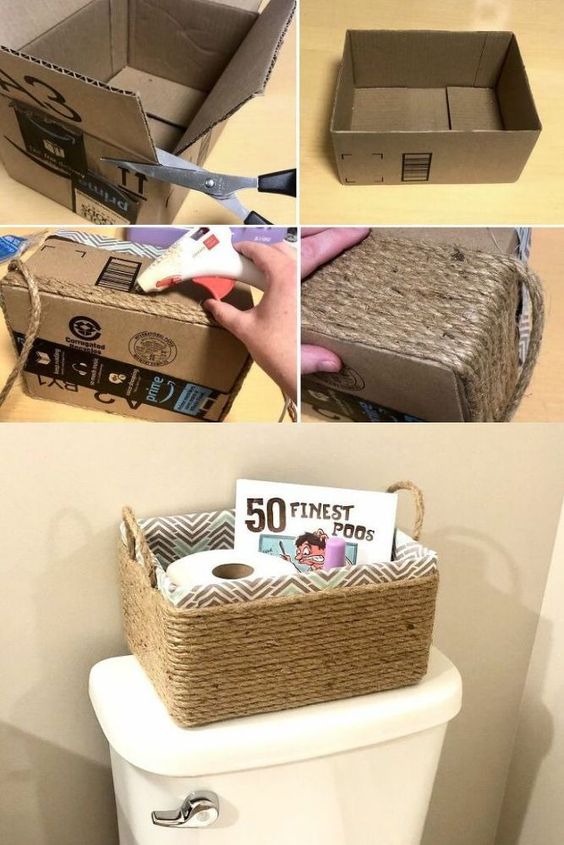
Once you’ve sewn across your lines, snip off the excess fabric corners and coax the inlay it into your box.
Next, fold over the ends at the top to create a lip. This is important if you want to leave a boarder of fabric at the top of your box like I did. This way even if your box is full to the brim with items, you will still see some of the lovely fabric you used.

I then sprayed some glue around the inside of the edges to keep my fabric in place and to give it a nice neat edge.

Time to wrap.
I thinned out one end of my rope by cutting some of it away so that you wouldn’t be able to see a big step-up when wrapping it around my box. With this said, I still started gluing on my least favourite side of the box so that you wouldn’t be able to see the steps or joins once it was done.
I blobbed hot glue sporadically along each line and pressed the rope down tight making sure that none of the box was visible between the rows and kept going until I was about an inch away from the top. I finished my last row on the same side I started so that any tatty ends would all be hidden.
I then cut two short pieces of rope for the handles and hot glued these in place on either side.

And that’s literally it! So easy and very therapeutic to make. My favourite part about crafts like this is putting to good use old bits and pieces that would otherwise probably end up in the bin. The only expense for me personally in this project was the rope which I could easily get two or three baskets from too. Also, now if I wanted to make another craft using the spare rope, I know it’s going to tie in with this decor.
Thank you for reading and as always, if you have any questions or crafty inspiration to share on this project or any of my other projects then please feel free to do so.
Please also check out my instagram page for more crafty fun – ha_ru_gi88