Head over to my BLOG for more in depth descriptions.
Pick the Right Tools for the Job1)Level 2) Orbital Sander 3) Tape Measurer 4) Electric Drill 5) Circular Saw 6) Saw Horses or Workbench
I have made it really easy for you and linked this to my LikeToKnow.It page where you can shop directly from there
Prep the WoodThe first step is to prep the wood. Before starting, measure your space, and cut your board to size. Next, sand and prep the wood for the stain. I start with an 80 grit sandpaper and then work up to a smaller grit like a 220.
Remember: The lower the grit the more coarse the sandpaper typically used for a more intense sanding. The higher the grit the finer the sandpaper typically used as a final step to smooth the wood.
It’s Time to add some StainUsing a stain brush, add an adequate amount of stain, and brush in the direction of the grain. Let it sit, the longer it sits the darker the stain. I wanted something a bit lighter so I removed the excess with a cloth right away.
Note: Use a pre-stain conditioner before you stain and a urethane the seal the wood once you are done.
To me, the Brairsmoke stain alone wasn’t 100% what I was looking for and a bit too ashy-grey. I wanted something warmer and with some brown tones. I decided to also apply an Aged-Wood Accelerator to enhance the dark brown undertones.
“L”evel UpUsing a tape measure, measure the distance that the shelf will span, and equally divide the length into four sections ( you will use more or less brackets depending on the size of your shelf). I suggest using the existing stud spacing as a guide. My shelf was a little under six feet and I decided to use four brackets for maximum stability.
Using the spacing that you measured previously, use a 2″ wood screw to secure your bracket to the stud. Making sure to stay level with each new bracket you install. You don’t want to get to the end and install a crooked shelf!
Please note that you should use drywall anchors if you are not going to be securing directly into a stud. This is especially true for larger shelves.
Secure the ShelfNow that your brackets are installed and level it is time to add the shelf. To secure the shelf we are going to use the 1″ screws that came with the brackets and drill upwards to anchor down the shelf. The brackets come with holes pre-drilled and I suggest using both holes to anchor down the shelf.
Repeat this step on all brackets.
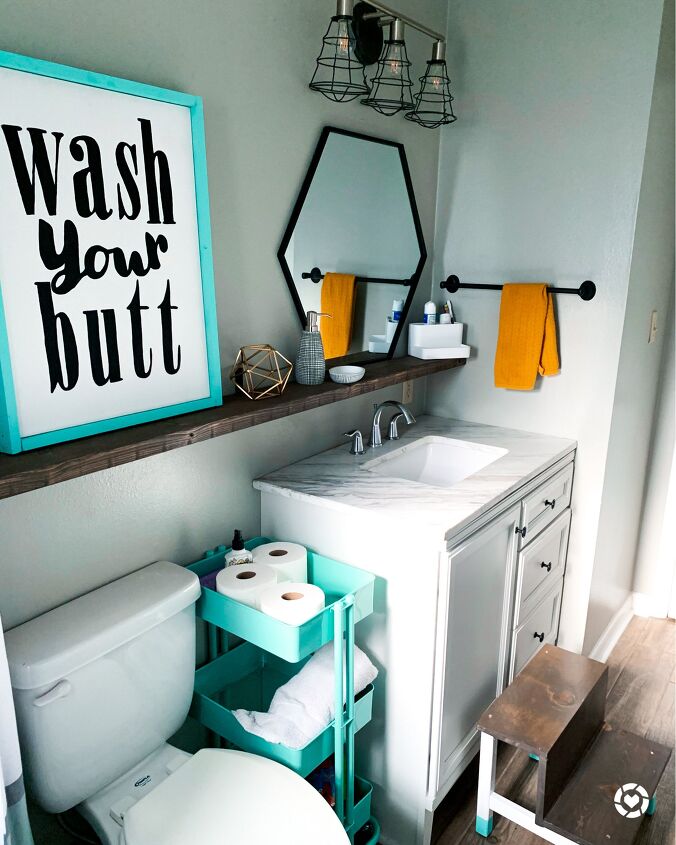
I Feel Like I am FloatingAs you know, this tutorial is very easy, and it is meant to give the illusion of an expensive floating shelf. To give this illusion of floating I suggest you purposefully dress up the shelf and conceal the exposed brackets. Don’t worry, the brackets only stick up a few inches and are easy to hide.
I love the finish product and it adds the perfect amount of horizontal storage that this space needed! Check out my blog post on how to make this awesome DIY Canvas Wall Art.
I have made it really easy for you and linked this to my LikeToKnow.It page where you can shop directly from there