
Other supplies purchased: Trim screws, Minwax stain (in Mission Oak), and four plastic trim pieces.
Tools used: Jigsaw, drill, tape measure, and compound mitre saw.
Other supplies purchased: Trim screws, Minwax stain (in Mission Oak), and four plastic trim pieces.
Tools used: Jigsaw, drill, tape measure, and compound mitre saw.


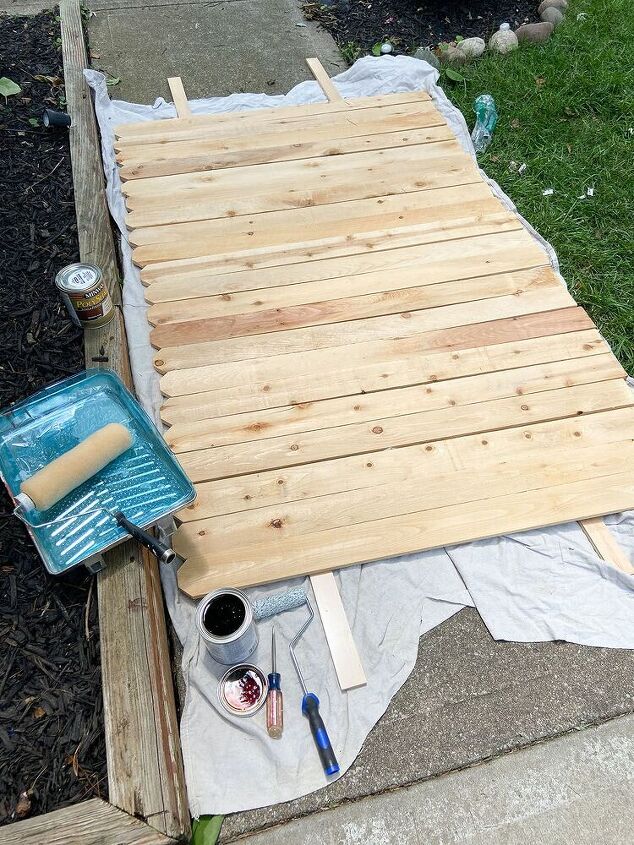
It was time to stain my pickets, so I laid about 20 pickets out in a group and began the staining process.


I normally stain with a paintbrush, but wanted to try using a roller instead so I could cover more area quicker.

It worked pretty well, but did tend to oversaturate the boards, so I finished them quickly.


Using a dry handful of paper towels, I wiped up all the excess stain and let the boards dry.


One regret I have is that I didn’t stain the board sides. I assumed that they would butt up next to each other when hung. But I realized that they needed to be spaced out a bit to allow for expanding and contracting.
I planned on staining the sides after they were hung…more on that soon.


I recruited my husband Ted to help me install the boards on the porch wall.

We measured and cut three affordable trim pieces to attach vertically to the wall.
These were used to lift the boards off the wall a bit to make them level with the existing door trim.

After cut, Ted quickly screwed the vertical slat to the wall.


In hindsight, we should have used the white side of the trim pieces so they would better bland with the creamy white wall. We didn’t realize this until later. Oh well.


Next up, we marked our picket boards and cut them down to size. I realized that this fat tip marker was not good for precise measurements, so I switched to a pencil. I’m really living and learning here, ha!

Since the porch wall was not the same width from top to bottom, we had to measure and cut for each board individually. This took a lot of extra time, but it made for a perfect fit throughout.

It was time for the first board to be installed screwed into the wall.
Again, I should have stained the board sides before the hanging stage, but I failed there too. No worries, I will show how I fixed that soon.


We used a pice of cardboard as a shim to ensure even spacing between boards throughout the whole wall.


Each step mentioned above was repeated down the whole wall. Measure wall, mark wood picket, cut picket, use level and shim, and screw into wall.

If we were to do this project again, I’d use the wide side of the strips to blend with the wall better. Not a deal breaker, but definitely obvious – lesson learned!

To quickly stain the sides of the boards, I grabbed some smaller paint brushed and began to stain. This step moved pretty quickly, but again, would have been easier if I stained the sides beforehand.


The wet spots and dripping you see on some of the boards is from the wet rag I used to wipe away the stain on the sides. It dried clear and drip-free.

We finally reached the moment to add the final board. It just needed to be cut down to size with a jigsaw first.

It was placed, and I quickly styled the space with a chair and side table.
I still need to use stainable wood filler over all the screw holes, but that will be a project for next weekend. 🙂

I absolutely love how the DIY wood cladding slat wall turned out!
Another hindsight moment: I didn’t take into account how shadowed the porch would be, and wish I would have gone one shade lighter on stain. It will fade over time though.


And here’s a zoomed out look at our house with the wood cladding wall complete. I’m a big fan!

You can see the vertical black trim pretty easily from here. I wish we would have realized that we should have used the white sides earlier – I’ll get over it soon, ha!

I’m really itching to purchase a new more modern front door, but wow, they’re pricey. Of course I’m on the hunt for a great deal – more on that in a future post hopefully.
Here’s a really quick and shoddy mockup of my dream door. We’ll also be adding similar house numbers like these soon.

And here’s a look at the house from a different view. I made the DIY house number wood sign on a semi-recent Hometalk TV episode.

I’m still in love with the affordable cylinder exterior lights we installed near our garage and front door.
They sell in a pack of two and have made such a difference in our exterior look.

In case you’re curious, here is a look at the lighting at night – so beautiful!


We also ordered some exterior post lights to be installed soon.
It’s all coming together after this painting, lighting, modern DIY wood cladding project. I’m finally liking our exterior – this fixer-upper has come a long way!
Anyone else planning some exterior updates? They make such a big difference.
P.S. Our daughter Vivienne took all the excess wood slats, and has been painting and crafting away. She and a neighbor friend will be having a neighborhood art sale and will donate all proceeds to St. Judes. All her idea. Heart melt!
