
Build a Privacy Screen for Your Utility Boxes
Painting the wood
The construction of this screen was simple and fairly quick, with the exception of waiting for each coat of paint to dry. I only had interior white paint and since I wasn’t entirely sure this screen would come together and, if it did, work like I wanted…..I decided to just use that paint. I applied two coats of the interior white paint with a foam paintbrush. The 1″ x 2″ boards I bought are the super cheap ones – under $2 for each 8′ board. The wood is really rough but I decided not to sand them. I struggle going with a rustic look and even though this doesn’t look rustic from a distance, the wood is ‘rustically rough’.

Cutting the legs & cross bars
Once the paint was dry, using my little compound miter saw, I cut two of the boards into 7′ lengths for the legs. I also cut two 8″ pieces and screwed them to the bottom of the legs to help provide some stability. They are 8″ because that is the size of the bottom of the buckets.

Construction of the frame
Next, I cut three pieces of 1″ x 2″ for the cross bars. These were the width of the lattice = 29″. This is 2′ wide lattice that I had cut into 3 sections. I used one section already so I only had two left. I decided to turn them sideways so the screen would be wider than 2′.
I attached 3 cross bars to the back of the legs with 2 brass screws on each end – one board at the top of the legs, one in the center and one 12″ above the feet of the legs.

Attaching the lattice
With the cross bars attached, I flipped the structure over and attached the two pieces of lattice to the front – centering them between the cross bars. I used *Elmers glue and my nail/brad gun with brads to attach them. I applied a little glue to the board where the lattice would be and then used the gun to attach it with brads.
*Optional

Cutting the trim
The last step in the construction was to cut and attach the trim. I used trim that I had on hand, left over from other projects. I cut two 29″ pieces and used the nail/brad gun to attach them (the pieces had been painted along with the 1″ x 2″ boards).

Lattice attached with brads
Now that the construction was done, I applied paint to the brads to cover them and prevent rusting.

Brads painted
Paint applied to brads.

Holes drilled in buckets
Before taking the screen and buckets to the side of the house to install it, I drilled holes in the bottom of each bucket for drainage as I planned to plant vines in each one.

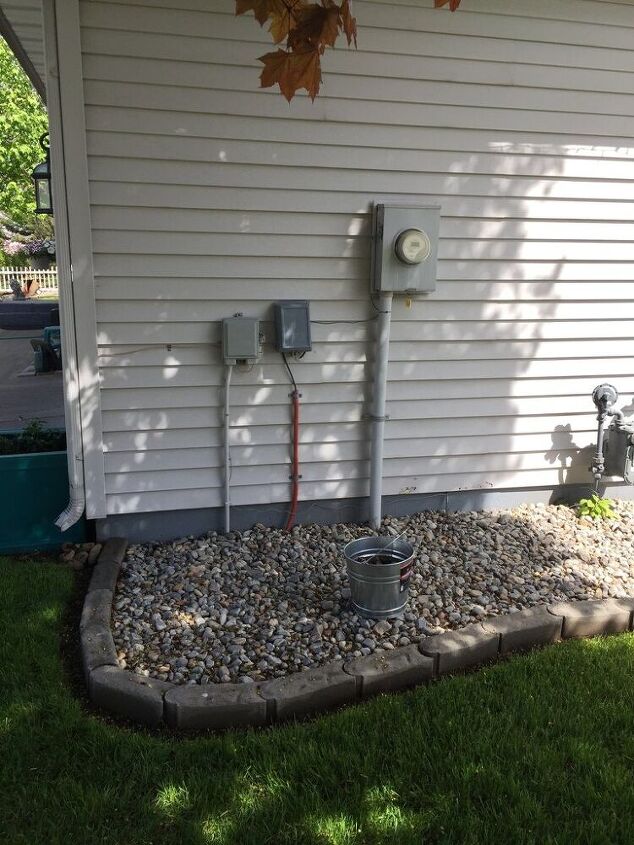
Installing the screen
Because I wasn’t sure if the Utility company might want me to move this structure, AND because our soil is SO rocky, I decided not to dig holes and install the legs in the ground.
The buckets are easily moved or removed if needed. After the holes were drilled, I took the buckets out to the rock garden, moved rocks out of the way and set them down. I then stood the screen in the buckets and filled them with rocks. I added larger rocks to the buckets after this picture was taken.

Securing the screen
With so many heavy rocks in the buckets and the rocks surrounding them, I was certain the screen would be steady….however, we got a huge windstorm the next day and when I went out to check on it, the screen was leaning as the bucket on the right had tipped! So….to prevent that happening again, I found a hole in the siding, added a screw and attached a wire between that and the leg of the screen at the top and then decided to add an additional wire at the lower portion of the leg.

Installed screen
The screen didn’t completely hide the utility boxes, but it does help shield them from view. I thought it might be nice to add some vines so I bought two Clematis to plant in the buckets. They were $14 each

Easy access to utility boxes
Since the lattice screen is set at an angle, it is easy to access all the utlility boxes.

Vines planted
Looking forward to seeing how these look once they have grown more. The one on the right will be pink.

Instructions
- Apply 2-3 coats of paint to all wood pieces
- Cut wood to desired length
- 2″ x 2″ – cut two 7′ pieces for the legs, two 8″ pieces for the feet, three 29″ pieces for the cross bars on the back sideTrim – cut three 29″ pieces for the cross bars on the front side
- Cut vinyl lattice to desired length
- Mine two pieces were 29″
- Create structure by attaching 2″ x 2″ crossbars to the back side of the legs using screws or nails, the feet to the bottom of the legs & the trim to the front of the legs.
- Attach the lattice to the front side of the legs using brads or small nails
- Set screen inside buckets and fill with rock
- For extra stability, attach wire to the leg closest to the house and around a screw that has been drilled into the siding.
For more pictures of the process, check out the post on my blog.

**Upgrades to the project***
After posting this project, I decided to add a 3rd support to the screen. This metal strap is located at the center of the leg and really provides stability in the wind.

Also after posting this project, I had some suggestions to paint this orange tubing that covers the wire to the cable box. I thought that was a great suggestion so I did just that!

I taped some newspaper behind the tubing and painted it with some white spray paint that I had on hand.

The process to paint this tubing took very little time and it looks so much better!

What a difference a little spray paint can make! I appreciate the suggestion to paint the tubing! It practically disappears behind the screen now!

There have been several questions on the box I built around the gas meter that sits behind this screen asking whether the meter can be read. The answer is Yes. Also, the utility company replaced our meter one day while I was not home. I noticed the box was a bit unlevel and went to find out why. I saw that the meter looked brand new – no rust on it like our old one had. When the box was set back into place, there was a rock under one of the legs. It was a quick fix to level it.